Leading manufacturer and supplier of ready mix concrete, liquid screed and concrete pumps for the South West
  • Variety of dimensions available
  • Manufactured on site
  • Available for delivery or collection
  • Request a quote

Concrete Block Manufacturers

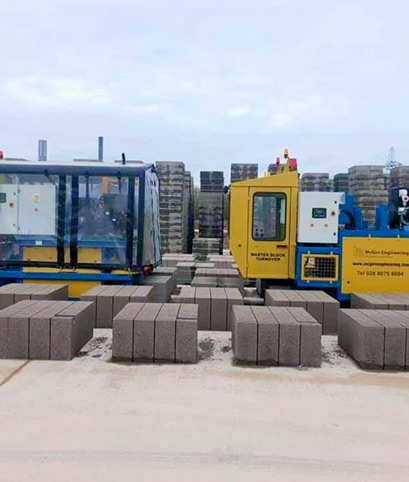
Wright Readymix is one of the leading concrete block manufacturers in the South West, manufacturing dense concrete blocks at its own plant in Avonmouth and supplying them directly to builders and contractors across Bristol, Bath, Newport, Cardiff, and the wider South West and South Wales.

As the manufacturer and supplier, we control the process from mix design through to despatch, because buying direct means there is no intermediary between your order and our production line. Concrete blocks are available in a full range of sizes for cavity and solid wall construction, for delivery or collection from our Avonmouth plant.

Dense Concrete Blocks: What We Manufacture


Dense concrete blocks are manufactured with a dense aggregate mix, resulting in higher compressive strength and mass than lightweight or aerated alternatives. This makes them the specified choice wherever structural performance, sound insulation, or fire resistance is a requirement, including load-bearing walls, party walls, and below-ground masonry.

Our dense concrete blocks are manufactured to a compressive strength of 3.6–30 N/mm² and a shear bond strength of 0.15N/mm² (tabulated value), with a D1 dimensional tolerance. They meet BS EN 771-3 for aggregate concrete masonry units and are tested to the A1 fire resistance grade, making them suitable for Approved Document B applications without additional treatment.

For full dimensions and technical specifications, see our concrete blocks page.

concrete block manufacturer

concrete block supplier

Block Sizes Available


At Wright Readymix, we manufacture concrete blocks in a range of dimensions to match project requirements:

  • Lengths: 290mm, 390mm and 440mm, sized to reduce cutting and speed up laying across most standard wall runs.
  • Widths: 75mm, 100mm, 140mm, 190mm, 215mm, 300mm and 440mm, covering cavity, solid, and party wall construction.
  • Heights: 100mm, 140mm, 190mm and 215mm, matched to standard coursing heights.

As with the dimensions, our concrete blocks page provides full technical specifications.

Why Choose a Local Concrete Block Manufacturer?


Ordering from one of the region's established concrete block manufacturers, rather than from a distributor, changes what happens on site. Lead times are shorter, deliveries are easier to schedule around your programme, and if you have a question about specification, you're speaking to the team that makes the product.

Wright Readymix manufactures dense concrete blocks at its own plant in Avonmouth, overseeing every stage from mix design and batching through to despatch. There is no third-party intermediary, no uncertainty over stock availability, and no passing the question on to someone else. When you order from us, you're dealing directly with the concrete block manufacturer.

For larger or more complex projects, Wright Readymix is backed by the LGW Group, which provides additional capacity and extended supply support without adding a layer between you and the plant.

Local manufacture also reduces haulage distances. Blocks despatched from Avonmouth reach sites across Bristol, Bath, and the wider South West faster than material trucked in from national distributors further afield.

Concrete Block Suppliers Across the South West & Wales


We are among the region's most established concrete block suppliers, serving construction projects across Bristol, Bath, Newport, Cardiff, Weston-super-Mare, Taunton, Cheddar, and Paignton, as well as the wider South West and South Wales.

Five manufacturing plants support this coverage, keeping delivery routes short and lead times consistent across the region. As concrete block suppliers with our own manufacturing base, we supply blocks in packs of 88, palletised and ready to offload, with delivery arranged direct to site or collection available from our Avonmouth plant for customers who prefer to arrange their own transport.

Get in touch with one of the top concrete block suppliers today to confirm availability and delivery to your site.

Applications for Dense Concrete Blocks


Dense concrete blocks are specified across a wide range of construction projects, from single-storey extensions to larger commercial developments.

Common applications include strip and trench fill foundation walling, load-bearing internal and external walls, and cavity wall construction where strength and moisture resistance are required. Their fire resistance and sound insulation properties also make them suited to party walls and compartment walls in residential and commercial developments, as well as retaining walls and below-ground masonry.

Builders and developers specify our dense concrete blocks for both new-build housing and renovation work, where consistent strength and dimensional accuracy keep build programmes on schedule. Dense concrete blocks are also used in garages, sheds, and garden walls, where their resistance to moisture and impact is well-suited to close-built developments.

If you're unsure whether a dense or lightweight block is the right specification for your project, our team can confirm the right type and size before you order.

Get in Touch


Wright Readymix is here to help with concrete block orders of any size, from a single pallet to a full site delivery. Call our team on 0117 958 2090 or request a quote online, and we'll confirm sizes, availability, and delivery to your site.

Concrete Block Manufacturers FAQs


We manufacture dense concrete blocks in a range of lengths (290mm, 390mm, and 440mm), widths (75mm, 100mm, 140mm, 190mm, 215mm, 300mm, and 440mm), and heights (100mm, 140mm, 190mm, and 215mm). If you need a specific combination for your project, contact our team and we will confirm availability.

We offer both. Blocks are delivered in packs of 88 directly to site or to your yard, and we will arrange a delivery slot that works with your build programme. If you prefer to collect, our Avonmouth manufacturing plant is open for customer collections – call the team to arrange.

Both. Wright Readymix manufactures dense concrete blocks at our own plant in Avonmouth, which means we supply direct from production. You are not ordering from a distributor or middleman – you are ordering from the manufacturer.

We deliver across Bristol, Bath, Newport, Weston-super-Mare, Taunton, Cheddar, Paignton, and the surrounding South West and South Wales region. To confirm delivery to your location, call us on 0117 958 2090 or use the contact form to request a quote.

Dense aggregate blocks are manufactured with a higher-density aggregate mix, resulting in greater compressive strength and mass than lightweight or aerated alternatives. This makes them the specified choice for load-bearing walls, structural applications, sound insulation, and fire-resistant construction.

Lightweight blocks trade some of that strength for better thermal performance, making them more suited to non-structural or insulation-focused applications. Wright Readymix manufactures and supplies dense aggregate blocks, tested to BS EN 771-3 and to A1 fire-resistance grade.

Concrete blocks are supplied in packs of 88, which is the standard unit we work to across deliveries and collections. Whether a smaller quantity can be arranged depends on the size and specifications of the block you need, your location, and how the order fits alongside other deliveries that week. As concrete block suppliers with our own manufacturing plant, we can usually accommodate smaller orders. Contact our team with the quantity and block type you need, and we'll confirm what's available.

Lead times for concrete block deliveries depend on order size, block type and specification, and your site location relative to our plants. Because we manufacture on-site in Avonmouth, as concrete block suppliers with direct control over stock and production, we can often turn deliveries around faster than distributors bringing material in from further afield, without waiting on a third party to release stock.

Contact our team with your order details, and we'll confirm the earliest available delivery date for your project.

Yes. While much of our work is with builders, groundworkers, and contractors, we also supply concrete blocks directly to self-builders and homeowners taking on their own projects. As concrete block manufacturers covering the wider South West and South Wales, we can help with extensions, garages, boundary walls, and other DIY builds, whatever the scale.

Blocks are available for delivery direct to your site or for collection from our Avonmouth plant, so you can choose whichever suits your project and transport arrangements.

Yes. If your project calls for more than one block size or specification, let our team know the sizes, widths, and quantities you need, and we'll confirm what can be combined within a single delivery or collection. Because we manufacture on-site, we have the flexibility to bring together different block types for the same job without requiring separate deliveries from multiple suppliers, which can simplify on-site scheduling.

We are the right people for you – let’s work together!
Contact us on 0117 958 2090 today to get a quote or to find out more.

News
What Is the Best Aggregate for Driveways & Shed Bases?
29th July 2026

The driveway looked good going down. The gravel was the right colour, the edging was straight, and the whole job was done in a day. Six months later, the sub-base had shifted, the surface was rutting under the car, and the whole thing needed lifting. The aggregate itself was fine. The problem was what went under it.

Choosing the best aggregate for driveways and shed bases is not complicated, but it does require knowing what each material is actually for. Load-bearing and drainage drive every decision. A vehicle-trafficked surface needs a sub-base that compacts hard and locks under repeated weight. A shed base needs a platform that sheds water and holds level. Get either wrong and no amount of careful finishing saves it.

This guide covers the materials that matter, the depths that work, and the mistakes that cost people twice.

What Type 1 & Type 2 Aggregate Do Differently

Type 1 and Type 2 are both unbound granular sub-base materials. They behave differently under load in ways that matter to anyone building a driveway.

Type 1 is well-graded crushed stone with a controlled proportion of fines that lock it together under compaction. That is the source of its load-bearing strength and why it is the standard sub-base for vehicle-trafficked surfaces. Construction Industry Research and Information Association's (CIRIA) susdrain guidance confirms that Type 1's high fines content makes it sensitive to moisture changes and largely impermeable, compared with open-graded materials chosen specifically to provide open voids [1].

Type 2 has fewer fines and compacts less tightly. It has a place under light pedestrian paving or as a drainage layer where water movement matters more than bearing capacity. Under a driveway, it is the wrong choice.

When To Use Type 2 Instead

Type 2 earns its place beneath soakaways, around French drains, or as an open-graded fill in a permeable driveway system. For any surface a vehicle will cross, Type 1 is correct. Using Type 2 beneath a driveway is a common and expensive mistake.

What Gravel Actually Stops a Driveway from Moving

A loose-gravel driveway that migrates onto the pavement or churns into ruts has almost always been built with the wrong material or a skimped sub-base. The surface gravel is rarely the issue. The problem sits underneath it.

Surface material matters too. Rounded materials like pea shingle roll against each other and never truly interlock. Angular crushed stone grips; compact it properly, and it holds position under wheel loads.

Ministry of Housing, Communities and Local Government (MHCLG) guidance on permeable surfacing of front gardens sets out the correct build sequence. It specifies a geotextile membrane at the base, a minimum 200mm of compacted open-graded sub-base, then approximately 50mm of decorative gravel at the surface. Conventional Type 1 contains sand and silt that blocks water movement, which is why open-graded materials are used in permeable systems instead [2].

Since October 2008, any impermeable front garden driveway over 5 square metres needs planning permission unless water drains to a permeable area. Gravel is permeable and does not trigger this. Ten-millimetre angular gravel gives a tighter finish underfoot; 20mm drains better and holds more effectively under tyres.

On softer or clay ground, the depth and specification for a sub-base changes. The same principles apply when choosing aggregates for hardscaping projects, where drainage and load-bearing sit alongside aesthetic choices.

Our aggregate and gravel range is available in bulk bags with delivery across Bristol, Bath, Cheddar, Avonmouth, Newport, and the wider South West.

How Thick a Gravel Base Actually Needs to Be for A Shed

The shed base that fails is almost always one that was compacted by someone standing on it and deciding it felt firm enough. It never is. Ask any groundworker who has lifted a sunken shed six months after the pour.

For a standard timber shed, work through the sequence in order:

  • Excavate topsoil down to firm ground and lay a weed membrane.
  • Add compacted Type 1 sub-base across the full footprint.
  • Top with levelled 20mm angular gravel, extended 50mm beyond the walls.

The Planning Portal's guidance on outbuilding foundations confirms that soil type is a significant factor in both depth and design. Clay soils expand and contract with moisture changes, affecting base performance over time. On firm ground, 100mm of compacted Type 1 is the working minimum; 150mm on soft or clay ground, or for heavier structures [3].

Gravel Base or Concrete: Which Is Right for A Shed?

Gravel drains freely, installs quickly, and needs no curing time. On soft ground, sloping sites, or under a heavy structure, a concrete slab is the more reliable choice. What neither will forgive is poor compaction. Compact in layers, check for level in both directions, and get it right before the shed goes on.

If you are moving from a gravel base to a concrete slab, the preparation sequence changes. Laying concrete correctly starts well before the truck arrives. The sub-base condition, formwork, and weather all affect the finished result.

The Decisions that Hold

Most driveway and shed base failures trace back to one of three choices made early in the job. Wrong sub-base material, rounded stone where angular should have gone, or a base compacted by eye rather than by depth. None of these mistakes is obvious at the time. They show up six months later, once load and water have done their work.

The three things that matter most:

  • Type 1 sub-base compacts hard and carries load; Type 2 does not.
  • Angular gravel interlocks under traffic; rounded stone migrates.
  • Compacted depth, not decorative depth, keeps a base level long-term.

Wright Readymix supplies 17 aggregate and gravel options in bulk bags, delivered across Bristol, Bath, Avonmouth, Cheddar, Newport, and Weston-super-Mare. The team can advise on material selection before you order, whether for a driveway, a shed base, or a larger groundworks job.

Call 0117 958 2090 or get in touch to discuss your aggregate requirements.

External Sources

[1] Construction Industry Research and Information Association (CIRIA), Structural Performance: https://www.susdrain.org/delivering-suds/using-suds/suds-components/source-control/pervious-surfaces/pervious-surface-types/structural-performance.html

[2] GOV.UK, Ministry of Housing, Communities and Local Government (MHCLG), Guidance on the Permeable Surfacing of Front Gardens (2026): https://www.gov.uk/government/publications/permeable-surfacing-of-front-gardens-guidance/guidance-on-the-permeable-surfacing-of-front-gardens

[3] GOV.UK, Planning Portal, Building Regulations: Foundations: https://www.planningportal.co.uk/permission/common-projects/outbuildings/building-regulations-foundations

Read more
Does Hot Weather Affect Curing a Concrete Shed Base?
15th July 2026

A hot spell might feel like ideal pouring weather, but it is exactly when curing a concrete shed base gets hardest to do properly. Heat pulls moisture from the surface faster than the concrete underneath can build strength, so a slab that looks dry by lunchtime can still crack within the week. Leave it uncovered on a warm afternoon, and you risk plastic shrinkage cracking, a soft core under a hard crust, or a slab that fails months later.

None of that is inevitable. Get the concrete for a shed base right at the ordering stage, then time the pour and protect the surface while it cures. Do this and you’re assured of a summer pour holds just as reliably as one poured in spring.

The difference between a base that lasts and one that cracks comes down to a handful of decisions made on day one.

Why Hot Weather Speeds Up Drying without Speeding up Strength

Heat, wind and low humidity all pull moisture out of a slab faster, but the concrete underneath still needs its full curing time to gain strength. That mismatch, a dry crust over a soft core, is what causes plastic shrinkage cracking on shed bases poured in summer. Higher temperatures also speed up cement hydration, giving a slab that feels strong early on at the cost of its long-term strength.

This summer has already brought a run of exceptional heat. The Met Office confirmed a record eight days above 34°C this year, the first on record with 35°C readings across May, June and July. A shed base with no shade will run hotter still [1].

BS 8500 sets a 35°C limit on concrete temperature at discharge for three reasons [2]:

  • Loss of workability, making the mix harder to place and compact.
  • Faster evaporation than strength gain, causing shrinkage cracks.
  • Thermally induced stress as the slab cools, raising cracking risk.

Why Fast Surface Drying Isn't Fast Curing

Wind and low humidity make the evaporation problem worse still, since both speed up moisture loss regardless of the air temperature. The mechanics of how concrete cures don't change with the weather; only the timing does.

Time Your Pour Before the Sun Gets to It

The biggest lever you have over hot weather curing is when you pour. The British Ready-Mixed Concrete Association’s (BRMCA) practical guide for site personnel sets a two-hour limit between loading and placing ready-mixed concrete, shorter still in hot weather. Heat speeds up how fast the concrete loses workability, so a stiff mix at the chute is one you're fighting rather than placing [3].

Shed bases aren't the only pour that suffers in this weather. The same discharge window and admixture questions apply to any pour scheduled during a heatwave.

However, if it's a scorching day, ask your supplier whether the load needs a retarding admixture at the plant to buy more working time. Flag it if your mix is air-entrained too, since entrained air turns unstable above 30°C, five degrees below the general limit, so delivery temperature needs tighter control.

Order for early morning delivery, as the concrete's most vulnerable hours land before the day's heat peaks rather than during it. Get the site ready before the truck is due, and the early-morning slot does its job properly.

A few things are worth locking down before the truck arrives:

  • Confirm your delivery slot for early morning, before eight.
  • Have shading or covers ready before finishing work is done.
  • Ask your supplier if a retarding admixture is worth adding.

None of this changes the mix itself. It just buys the concrete time to cure before the heat starts working against it.

Protect a Freshly Poured Base While It Cures

Once the base is placed, the job is keeping moisture in, not adding more on top. Covering the slab, shading it and controlling rewetting keeps enough water in the mix to cure properly, not just look dry on top.

Good curing, not a stronger mix, reduces drying shrinkage cracks, according to the Concrete Society, by giving the concrete more time to build strength before it dries out. Shrinkage happens in the cement paste, not the aggregate, which is why managing how it dries does more to prevent cracking than anything added to the mix [4].

3 Habits That Undo an Otherwise Good Pour

  • Hosing the surface down mid-afternoon to cool it off.
  • Leaving the sheeting off overnight because the day felt cool enough.
  • Removing formwork early because the surface looks set.

If this is a first shed base pour, our guide on preparing a shed base covers prep done for April conditions rather than August ones.

Getting It Right Despite the Heat

Before this, hot weather curing probably looked like one more risk on a job you were already unsure about. After it, the plan is straightforward, and it comes down to three habits rather than luck. Follow them, and a slab poured in August cures just as reliably as one poured in April, only with more attention along the way.

The steps that matter most:

  • Pour first thing in the morning, before the heat builds.
  • Cover the base and keep the sheeting on overnight.
  • Leave the hose alone, however dry the surface looks.

Wright Readymix has supplied ready-mixed concrete and advice on jobs like this across the South West and South Wales for years, from small domestic pours to full commercial slabs. Our team talks through mix, volume and delivery timing before you book, then follows through on delivery day too. That matters most when the weather is working against the pour rather than with it.

Call 0117 958 2090 or get in touch to talk through timing and delivery for a shed base pour in hot weather.

External Sources

[1] GOV.UK, Met Office, Heatwave Continues as UK Records Unprecedented Run of 35°C Days (2026): https://www.metoffice.gov.uk/about-us/news-and-media/media-centre/weather-and-climate-news/2026/heatwave-continues-as-uk-records-unprecedented-run-of-35c-days

[2] Concrete Society, Hot Weather Concreting (2025): https://www.concrete.org.uk/fingertips/hot-weather-concreting/

[3] British Ready-Mixed Concrete Association (BRMCA), Ready Mixed Concrete – Practical Guide for Site Personnel (2017): https://brmca.org.uk/documents/BRMCA_Ready_Mixed_Concrete_Practical_guide_October_2017.pdf

[4] Concrete Society, Reducing Drying Shrinkage Cracks (2025): https://www.concrete.org.uk/fingertips/reducing-drying-shrinkage-cracks/

Read more
How to Clean a Concrete Driveway & Remove Oil Stains
17th June 2026

The car is sold, moved on, or replaced, and what’s left behind is a dark patch that wasn't there before. Months later, it’s still there, slightly duller than the surrounding concrete, no matter how many times a hose has been run over it. A driveway like this is one of the first things anyone notices, whether that’s a visitor, a neighbour, or a buyer looking round a property.

The good news is that most of it comes off. A clean concrete driveway is achievable with a methodical approach, using the right method for the right stain and starting gently before working up. Anyone weighing up concrete for driveways that resists staining from the outset might find that worth a look too.

Here is what actually works, stain by stain.

Common Types of Concrete Driveway Stains

The three stains you are most likely to be dealing with are oil and grease, rust, and general dirt with moss or algae. Each behaves differently once on concrete, which affects how you tackle it.

Oil and grease are the trickiest because concrete is so porous. According to Which?, this high porosity makes concrete the hardest surface type to clean, allowing stains to work their way deep into the surface, which is why a fresh spill that looks easy to wipe up can leave a shadow behind weeks later. Rust marks usually come from metal garden furniture, tools, or a car jack left in the same spot for too long, and they tend to sit closer to the surface than oil [1].

Dirt, moss, and algae build up over time in shaded or damp areas and are mostly surface issues rather than penetration issues. Stubborn black spots from lichen that thrives in moist conditions can be more resistant and may need repeat treatment.

The driveway needs different things depending on which of these you are dealing with:

  • Oil and grease stains need to be absorbed first, then a degreaser is applied multiple times.
  • Rust marks respond well to a rust-specific remover applied directly to the mark.
  • Moss, algae, and dirt usually lift with a stiff brush, detergent, and a rinse.

How To Remove Oil Stains from Concrete

The most reliable approach to oil stains starts gently. If the spill is fresh, the first job is to stop it from spreading and soaking in further, so blot it with an absorbent material like cat litter or sawdust rather than wiping it across the surface.

For older stains, household products are worth trying before reaching for anything stronger. Squirting washing-up liquid into a bucket of warm water, pouring it onto the affected area, and scrubbing with a broom before rinsing thoroughly is a method some people swear by. Baking soda mixed into a paste and left on the stain for a few hours before scrubbing can also help draw oil out of the surface.

Why Oil Is So Hard to Shift Once It's Set In

Once oil has had time to soak into the concrete, it bonds with the material at a level a surface wipe cannot reach. A concrete-safe degreaser, applied as the manufacturer instructs and left to work before rinsing, is designed to break down oil that has penetrated rather than just sitting on the surface.

Stubborn or older stains rarely lift in one go. Repeating the treatment, sometimes two or three times over a few days, gradually draws more oil out with each application. If a small domestic patch is part of a wider project, our DIY concrete page covers what is involved in replacing a section rather than just how to clean it.

Pressure Washing Tips for Concrete Driveways

A pressure washer can help with general grime and can assist with oil and rust once the stain has already been treated, but it is not a stain remover on its own, and the wrong technique can do real damage to the surface. Getting the settings right matters more than the machine's power.

For concrete and brick, Which? recommends the following settings and technique:

  • Use a 15-degree nozzle with a pressure setting of 2,500 to 3,000 PSI.
  • Start with lower pressure and test a small area first.
  • Work in a consistent sweeping motion, taking care around softer or damaged bricks.

Pressure washing is most useful as a finishing step, after a degreaser or detergent has already broken down the stain. Used that way, it rinses away loosened dirt and residue without forcing reliance on raw pressure to shift the mark itself [2].

What to Avoid When Cleaning Concrete

A few common habits cause more harm than the stain they are meant to fix, and it is worth knowing what they are before you start. The following three mistakes account for most avoidable damage:

  • Going straight to the highest pressure setting without testing a small area first.
  • Using undiluted bleach or strong acidic cleaners, which can etch the surface.
  • Holding the lance too close can dislodge mortar and let weeds establish.

If a cleaned patch ends up looking lighter, rougher, or more porous than the rest of the driveway, one of these is usually the cause. At that point, the best fix is often a sealant over the whole drive to even out the appearance and protect it going forward.

Talk to the Team Before You Decide

A driveway covered in oil stains and old grime can feel like a lost cause, but most of it lifts with patience and the right order of steps. Once it is clean, sealing the surface protects against future spills and keeps the drive looking right for longer.

Wright Readymix has spent years supplying concrete for driveways and domestic projects across the South West and South Wales, and understands the wear that leads to these stains in the first place. If an existing driveway is past the point where cleaning helps, or a new one needs a mix built for durability, the team can talk through the options.

Get in touch to discuss your driveway concrete requirements or call 0117 958 2090 to speak to the team directly.

External Sources

[1] Which?, Danny Dougan, Best Patio Cleaners 2026: https://www.which.co.uk/reviews/patio-cleaners/article/best-patio-cleaners-a8cIA3O3krKQ

[2] Which?, Manca Virant, Common Mistakes To Avoid When Using a Pressure Washer: https://www.which.co.uk/news/article/common-mistakes-to-avoid-when-using-a-pressure-washer-a6q3O7U8gTit

Read more
How to Prevent Air Pockets in Concrete Slabs & Bases
08th June 2026

A concrete slab should be a uniform mass. When air pockets in concrete disrupt that uniformity, the result is a network of weak points distributed throughout the structure. Now, these points may not show at the surface, but they will determine where the slab fails first.

What makes it frustrating is that the conditions producing voids are almost entirely within your control. Mix consistency, pour technique, vibration, and base preparation all play a part, and each is manageable with the right ready mix concrete and the right approach on site.

Here is what you need to know before your next pour.

What Causes Air Pockets in Concrete?

Air pockets, also called voids or entrapped air, form when air becomes trapped inside the concrete mix during or after the pour. Unlike air-entrained concrete, where microscopic bubbles are deliberately introduced to improve freeze-thaw resistance, entrapped air is uncontrolled and damaging.

The most common causes are:

  • Pouring concrete too quickly into the formwork.
  • Using a mix that’s too stiff to flow around the reinforcement.
  • Failing to compact or vibrate the concrete after placement.

Mix consistency matters throughout. A mix that is too dry will not move freely enough to fill the formwork, while an overly wet mix can segregate, with aggregate sinking and water rising to the surface.

Why Air Pockets Lead to Weak Concrete

Voids reduce load-bearing capacity and structural integrity. A slab with internal air pockets is not a uniform mass; it is a series of weak points connected by sound material, and under load, those weak points become the failure points.

For applications such as shed bases and driveways, surface consequences matter as much as structural ones. The Concrete Society (CS) defines honeycombing as coarse, stony areas caused by insufficient fine material, poor mixing, or formwork leakage [1].

Shallow honeycombing is mostly cosmetic, but deeper areas reduce the protection the concrete cover provides to reinforcement, and correction requires increasing the sand and cement content, along with proper mixing and compaction.

Our Newport project where concrete pumping was required in challenging site conditions shows how mix and placement decisions play out together on a real job. It’s a useful reference if you are dealing with access constraints or restricted pours.

How to Prevent Air Pockets During Pouring

Pour in layers rather than placing the full depth in one go. This gives you control and allows each layer to be compacted before the next goes in. Avoid dropping concrete from height; the further it falls, the more likely it is to segregate or trap air on impact.

It is also worth understanding the difference between entrapped air and deliberately entrained air. CS notes that air-entraining admixtures produce small, stable bubbles, mostly below 1mm in diameter, distributed uniformly through the mix to improve freeze-thaw resistance. However, for every 1% increase in air entrainment, concrete strength falls by about 5%. Uncontrolled entrapped air introduces far larger, irregular voids with none of those benefits [2].

The Role of Vibration & Compaction

Proper compaction is the most reliable way to remove entrapped air after placement. CS is clear that concrete not properly compacted will have reduced strength, increased permeability, reduced durability, and surface blemishes, including blowholes and honeycombing. Vibration works by fluidising the concrete, allowing entrapped air to rise to the surface [3].

For in-situ pours, an internal poker vibrator is the standard tool for thick sections. For smaller DIY pours, rodding (working a straight bar up and down through the mix) provides basic compaction; it is less effective than mechanical vibration but significantly better than nothing. On thin slabs, tamping with a straight edge helps consolidate the upper layer and close surface air.

Finishing Techniques to Avoid Surface Defects

The timing of finishing matters as much as the method. Bleeding occurs when mixing water rises to the surface as solid components settle, and it continues until the cement paste stiffens enough to halt the process.

CS identifies two risks with the top surface finish. If bleed water is remixed during finishing, the result is a weak top layer; therefore, finishing should wait until the bleed water has evaporated. If evaporation outpaces bleeding, plastic shrinkage cracking may occur [4].

Screeding should follow immediately after compaction; a bull float is then used in long, overlapping passes, and a broom or trowel finish is applied once the surface has lost its sheen. Avoid overworking the trowel, as it can bring fines to the surface and seal in air just below.

Practical Tips for Better Concrete Slabs

A few consistent habits reduce the risk of air pockets across most pours:

  • Check your base before the truck arrives; soft spots will not compact out.
  • Use a GEN3 or C20 for most domestic bases; stiffer mixes are harder to consolidate.
  • Have compaction equipment ready before the pour starts, not after.
  • Pour at a pace your compaction can keep up with; do not let sections outrun you.

Read the site before booking; access and slope shape how the pour runs.

These are not complicated adjustments, but they are easy to skip under time pressure. The contractors and self-builders who see consistent results are the ones who plan the pour as carefully as they plan the specification. Our testimonials reflect that, time and again, the jobs that go smoothly are the ones where preparation came first.

For projects where standard truck access is not possible, our innovative mini pump handles restricted sites where wheelbarrows cannot reach. So you can keep pour control intact even on difficult ground.

Getting Air Pockets Right Starts Before the Pour

Air pockets do not form by accident. They form when preparation is skipped, the mix consistency goes unchecked, or compaction gets rushed. The result is a slab that looks sound on the day and shows its weaknesses later. Remember, the steps in this guide need to be in place before the truck arrives, not after.

Wright Readymix supplies ready mix concrete and liquid screed to contractors and domestic customers across the South West and South Wales, from five plants with consistent mixes designed for the applications that matter on real sites. Part of The LGW Group, the team is available 24/7 to advise on specification, volume, and delivery logistics.

Call 0117 958 2090 or get in touch to discuss your pour, your mix specification, or anything else you need to get the job done properly.

External Sources

[1] Concrete Society (CS), Fingertips, Honeycombing of Concrete: https://www.concrete.org.uk/fingertips/honeycombing-of-concrete/

[2] Concrete Society (CS), Fingertips, Air-Entraining Admixtures: https://www.concrete.org.uk/fingertips/air-entraining-admixtures/

[3] Concrete Society (CS), Fingertips, Compaction of Concrete: https://www.concrete.org.uk/fingertips/compaction-of-concrete/

[4] Concrete Society (CS), Fingertips, Bleeding and Segregation: https://www.concrete.org.uk/fingertips/bleeding-and-segregation/

Read more